How to install Let’s encrypt SSL on WordPress the 'no-stress' way
6 December 2017
Now I’m writing this for everyone who has, just like me, never installed SSL from Let’s Encrypt on WordPress. Few points to know before we start:
- There are blog posts that advise you to change your site url from `http` to `https`. DO NOT DO that. You’ll block access to your site AND to the admin area.
- Hold your horses with the CloudFlare or any other CDN that you’re using. Disable it. One thing at a time, please. When there are too many players in the equation you wouldn’t know whose fault that is in case something goes wrong.
- Leave `.htaccess` file alone for now. I’ll talk about it later.
Step 1: Get the certificate.
Firstly, you need to activate your certificate. Now, most hosting providers have Let’s Encrypt ‘one click’ option.
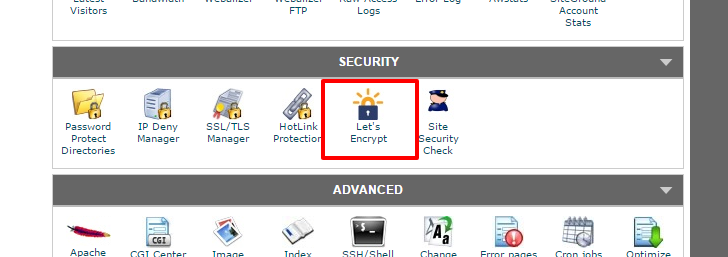
You choose the domain, enter your e-mail, click the button, and voila! Now you have your certificate.
Step 2: Test
Before going all-in you need to see if you actually have that certificate on. Otherwise, you’ll be trying to enable something that doesn’t exist. So start with the admin area.
In your wp-config.php you do
define('FORCE_SSL_ADMIN', true);
then go to /wp-admin/ on your site and see if you get that green lock.

If you do, you go to step 3. If you don’t, then it’s just like in the case with the doctors. You can read whatever you want on WebMD, but that doesn’t mean it all applies to you. You still need to see the doctor to know exactly what’s wrong. So contact your customer service, they should tell you more about what’s wrong with your server or site or certificate or whatever.
Step 3: Go nuts

If you have ‘enforce ssl` option in your cPanel somewhere - use it.

Additionally, you can start redirecting all traffic to the https version of your site with some .htaccess code. You know how you have
# BEGIN WordPress

RewriteEngine On

// with some stuff already here by default

# END WordPress
well, right after RewriteEngine On insert this bad boy
RewriteCond %{HTTPS} off
RewriteRule (.*) https://%{HTTP_HOST}%{REQUEST_URI} [R=301,L]
This would redirect all your traffic to the secure version of your site.
Step 4: Test
Browse your site. Make sure it redirects to https, and it works alright. Test on Chrome AND Firefox, make sure they don’t give you any trouble either.
Step 5: Befriend CDN with the SSL
Some hosting providers have CDN by default. In this case, you can just leave it deactivated for 24 hours, then activate it, and it should be fine, i.e. you won’t be getting ERR_SSL_VERSION_OR_CIPHER_MISMATCH error.
If not, then you’d need to read more on how to connect your CDN with the SSL. I’ll update this post in case I know any specifics.
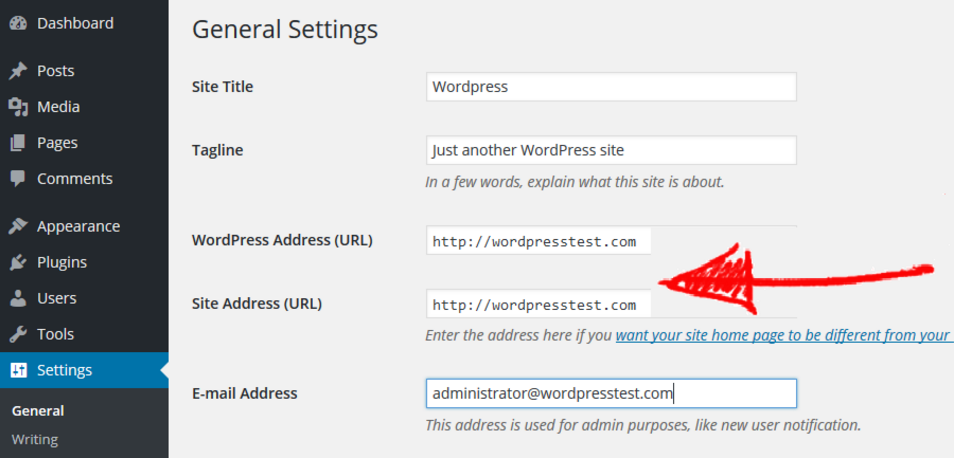
Step 6: Change site URLs in settings
NOW you can change http to https in your settings admin.
What if you already screwed up
There are multiple ways that things could go sideways.
1. You changed http to https in the settings
…and you’re locked yourself out of the admin area. In that case you’d need to go to the database, look for wp-options row and change https back to http.

This is usually done through phpMyAdmin tool.

You can also do
define('WP_SITEURL', 'http://example.com/wordpress');
define('WP_HOME', 'http://example.com');
in your wp-config.php file. I found the SQL change quicker tho.
2. You’re getting ERR_SSL_VERSION_OR_CIPHER_MISMATCH or similar in your browser.
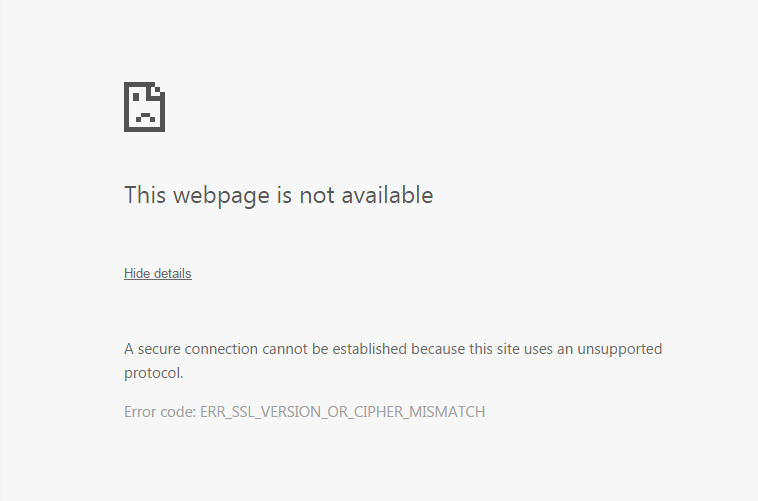
In my case that was the CDN. Disable that fellow for now. They need 24 hours to get used to your new shiny SSL certificate. Clean your cache. Refresh.
3. You’re still not getting that green lock.
Clean your urls. All the hrefs and src everywhere, including css and js files. Take out the http part and just leave the link, e.g.
<img src="//example.com/image.jpg" alt="image">
Safe browsing!